
Project Templates
Project templates allow you to save the settings of a past or present project and apply it to another. Project templates can be created with a few clicks so when you can create a new project you simply select an existing project template.
When you create a project template, the following settings are saved within the template:
- Default due date for new issues
- Default issue color attribute property
- Issue mandatory attributes
- All the issue attributes (Zones, Phases, Status, Types, Labels & Priorities)
- File sets
- Viewer categories appearance overrides
The following items will NOT be saved with the project template:
- Issues
- Assigned user and their roles
- 3D Models & Sheets
- Saved views
- Quick Filters templates
- Reports templates
There are two actions required to create a template based on a project. First create the template from the project settings menu. Second is to create the project using a template.
Create a template
To create a project template, you must be a hub administrator and project administrator of the project you would like to export as a template. If you meet those two conditions, you will have access to the template creation window in the project setting page.
Step-by-step procedure:
- From the web platform, select a project.
- Open the “Project Settings” page.
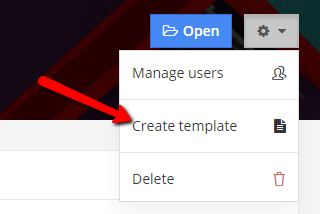
- Locate and click the gear icon at the top right corner of the page.
- Select “Create Template” from the list.
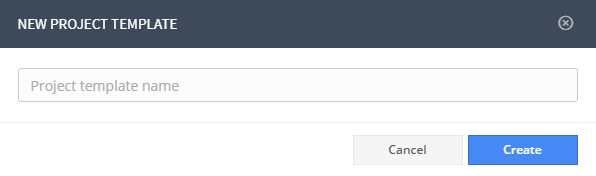
- Enter a name for the template in the text field.
- Lastly, click Create to save the template.
Once you have created your template, it will not be possible to edit it.
Create a Project Based on a Template
Once you have saved a project template, you can create new projects using the exported project settings. One thing to keep in mind is, to create projects, you need to be a hub administrator.
Step-by-step procedure:
- From the web platform, open the “Projects” page.
- Locate and click the Add project button.
- In the popup window, enter a name for your project.
- Using the drop-down menu, select the template to be applied to the new project.
- Lastly, click the Create button to create the project.