
Publish a Model to the Viewer from Navisworks – Private BETA (invite only)
The feature is now available for all Navisworks versions from 2019 to 2021.
Projects can be published to the online viewer directly from Navisworks without having to go through the process of exporting the IFC, and uploading it to the viewer.
March 29th 2021 Update: When publishing multiple models, each model is published independently so that if one model crashes, all the others will be published. You will be notified of the model(s) could not be published once the whole process is completed.
- Better category mapping for different objects
- Object proprieties transfer
- Resulting file size
- Export time
- Isolate element on the published model in the web viewer
Publishing a New Model
Once the model is opened in Navisworks and the appropriate hub and project are selected in the Newforma Konekt add-in, the «Publish» button will appear in the Newforma Konekt section of the Navisworks Ribbon.

Click on the «Publish» button and the following window will open.
Model name: This is the name of the exported IFC will have in the viewer.
Associated discipline(s): In this drop-down menu, it is possible to select the discipline that will be assigned to the model that is about to be published.
Create model: If the viewer contains a folder in the project tree selection, it will be possible to see it and choose exactly where the model will be added to.
Clicking on the «Publish» button will then publish the model as an IFC to Newforma Konekt.
Publishing a Revision
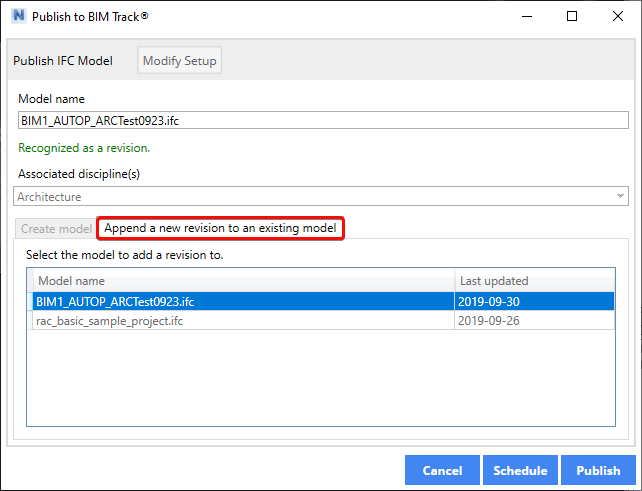
Append a new revision to an existing model: If the model is a revision of an existing one in the viewer it is important to select this section of the window and select the correct model the revision needs to be added to.
Clicking on «Publish» will then publish the model as a new IFC which will be linked as a revision in Newforma Konekt.
Scheduling a Model to Automatically be Published
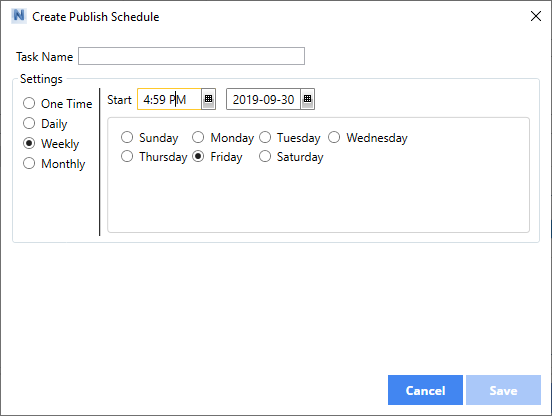
Clicking on the «Schedule» button at the top of the dialog box will open the Create Publish Schedule dialog box. Give the task a name, select the frequency needed for this publication to take place and select the time conditions. In the screenshot below, the model is scheduled to be published at the end of each week, every Friday at 4:59 pm. Clicking on the «Save» button will create this automated task. Afterward, a window prompt will appear mentioning that the task was successfully created.
The model will now be published automatically to the Online Viewer at the next scheduled date and time.
As a Newforma Konekt user and member of the Newforma Konekt BETA Program, you can submit a request to our customer success team to access this BETA project and try out the latest features. You can provide feedback directly in our Newforma Konekt community once your application has been approved.