
Restricting Issue Visibility
Issues with restricted visibility are an evolution of the Confidentiality attribute. It was introduced to give users more control over who can view the issue independent of having to add contributing team(s) to it. When a user wants to control who should have access to an issue, he can activate the limited visibility mode so that only the users involved have access.
This article explains the impacts of the feature and how to restrict / give access to issues.
Impacts
The default behavior of the issue’s visibility is changed with the feature. By default, new issues will be visible to all users of a project even if there are teams in the team involved field.
Existing issues that have had their visibility restricted by adding one or more teams in the Confidentiality field will retain their restricted visibility so that only the author, the assignee and team(s) involved can access them. If there were users in the Notify field, they will now also have access to the issue.
Archived issues retain the same visibility. Thus, an archived issue is only visible to users who could access it before it was archived.
Set the visibility of issues
When a list of issues is shown to a user, only those visible to this user are included in the results to prevent him from seeing any restricted issue he doesn’t has access to. A restricted issue is visible to users who are either: Author, Assignee, Notified, Member of a team involved in the issue.
Being a project administrator and-or a project creator doesn’t provide the capability to see issues with restricted visibility that you wouldn’t have access to as a non-admin user. Project administrator and project creators have access to the issues that are restricted when he is the author, assignee, notify or member of the team involved.
To give/restrict access to your issues, follow the instructions of watch this short video.
Anyone who can edit an issue can set the issue visibility to make sure only authorized users can view them. It can be done in creation, single edition, and multiple edition mode, both from the web platform and from the add-ins.
To be able to fill in the value of the limited visibility field, you must have the latest version of our add-ins installed.
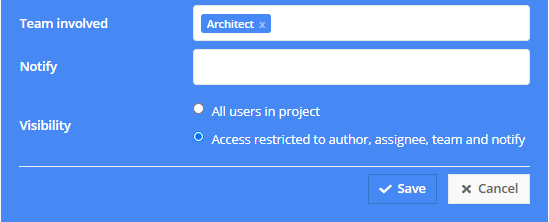
When creating or editing an issue, the visibility options include:
- All users in project – allows any users of the project to view the issue.
-
Access restricted to author, assignee, team and notify – restricts visibility and access to the author of the issue, the person the issue is assigned to, team involved and notify.
It is possible for someone to lose access to an issue by changing its visibility for restricted.
By marking the visibility as restricted and not involving other users (or adding teams to the team involved attribute) to it, you can mimic the concept of a draft issue. You can assign the issue to yourself and mark the visibility to restricted to be able to create a quick filter (Assignee = Me AND Visibility = Restricted).
If you need to edit multiple issues, you can filter issues based on visibility before using the multi edit feature.
You can also set the visibility when importing BCF Files from the web platform’s Issues page.
To verify if an issue is restricted, on the right of the issue title, a padlock icon will indicate that the issue is restricted to the author of the issue, the person the issue is assigned to, the team(s) and followers.
Limitations
The feature is not supported by the BCF REST API, the REST API and the BCF file import or Excel export.